IT Technical Support for Developers
Windows
0x00000040, How to Fix Win 11 Printer Sharing to win 10 /win 7
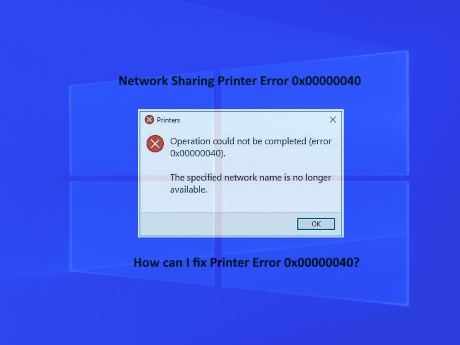
Operation Could Not Be Completed Error 0x00000040 The Specified Network Name Is No Longer Available
How can I fix Printer Error 0x00000040?Windows 11 Network Printer Sharing to Windows 10 / Windows 8 / Windows 7
It’s a common error that users face if a third-party printer driver is installed on the print server. Fortunately, you can fix this by following some simple steps.
Printer Error 0x00000040 can be fixed by following some simple steps.
Printer Error 0x00000040 can be fixed by following some simple steps.
What causes Operation could not be completed (error 0x00000040)?
Windows 10/11 doesn’t allow users to install a third-party printer driver on the print server. You need to change the Group Policy settings or tweak the Registry to resolve the issue. The other reasons for this error could be:
1.Point and Print Restrictions policy
2.Pending print jobs in Print Spooler
3.Printer Driver issues.
Run Printer Troubleshooter
1. Press Windows Key + I to open Settings.
2. Scroll down and select Troubleshoot > Other Troubleshooters.
3. Click on Run beside Printer.
4. Once the process is complete, restart your device to see if the printer error has been resolved.
1. Press Windows Key + I to open Settings.
2. Scroll down and select Troubleshoot > Other Troubleshooters.
3. Click on Run beside Printer.
4. Once the process is complete, restart your device to see if the printer error has been resolved.
Modify Group Policy Settings
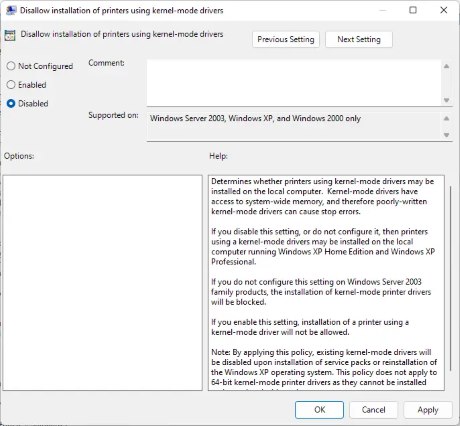 Kernel-mode drivers operate in kernel mode and have unlimited access to hardware and memory. But sometimes, the kernel-mode driver’s policy can malfunction due to corrupted drivers. Disable the policy and check if the error is fixed.
Kernel-mode drivers operate in kernel mode and have unlimited access to hardware and memory. But sometimes, the kernel-mode driver’s policy can malfunction due to corrupted drivers. Disable the policy and check if the error is fixed.
Disable the Point and Print using Registry Editor
1. Press the Windows key + R to open the Run dialog box.
2. Type regedit and hit Enter.
3. Navigate to the following path :HKEY_CURRENT_USER\Software\Policies\Microsoft\Windows NT\Printers\PointAndPrint
4. right-click on InForest and select Modify.
5. Now enter the Value data as 0 and click Ok to save the changes.
6. In the same way, change the value data of Restricted and TrustedServers to 0.
7. Close the Registry Editor and restart your computer.
Update Printer driver
Update your Printer driver and see. Keeping your drivers up-to-date is very important. Although Optional Updates do update some of the drivers, some require you to download the driver manually from the manufacturer’s website.
Update your Printer driver and see. Keeping your drivers up-to-date is very important. Although Optional Updates do update some of the drivers, some require you to download the driver manually from the manufacturer’s website.
Win 11 an existing connection was forcibly closed (OS error 10054)
SQL server error 10054 - Fix
Error 10054,
Cannot connect remotely to SQL Server Express Win 11, A network-related or instance-specific error
Cannot connect remotely to SQL Server Express Win 11, A network-related or instance-specific error
ADDITIONAL INFORMATION
A network-related or instance-specific error occurred while establishing a connection to SQL Server. The server was not found or was not accessible. Verify that the instance name is correct and that SQL Server is configured to allow remote connections. (provider: SQL Network Interfaces, error: 26 - Error Locating Server/Instance Specified) (Microsoft SQL Server, Error: -1)
A network-related or instance-specific error occurred while establishing a connection to SQL Server. The server was not found or was not accessible. Verify that the instance name is correct and that SQL Server is configured to allow remote connections. (provider: SQL Network Interfaces, error: 26 - Error Locating Server/Instance Specified) (Microsoft SQL Server, Error: -1)
Got the same issue on a Windows 11 computer trying to connect to an old SQL 2005 DB.
It looks like some ciphers are disabled on Windows 11 and prevent the connection with the Database.
Solution
In Powershell (as admin) after running the following command, I could connect to the DB. Hope this helps.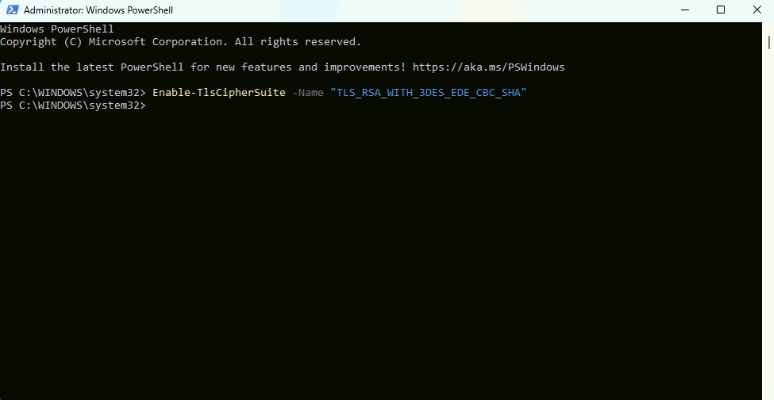
Enable-TlsCipherSuite -Name "TLS_RSA_WITH_3DES_EDE_CBC_SHA"
Copy and paste the above command in powershell, it will work for you.
Key Search
sql server error 10054 windows 11
mssqlserver-10054-database-engine-error
windows 11 accessing sqlexpress error 10054
error 10054 an existing connection was forcibly closed by the remote host
sql server error 10054 pre-login handshake
SQL Server not connected after windows 11 update
sql server error 10054 windows 11
mssqlserver-10054-database-engine-error
windows 11 accessing sqlexpress error 10054
error 10054 an existing connection was forcibly closed by the remote host
sql server error 10054 pre-login handshake
SQL Server not connected after windows 11 update
Windows 10 printer sharing error 0x0000011b FIX
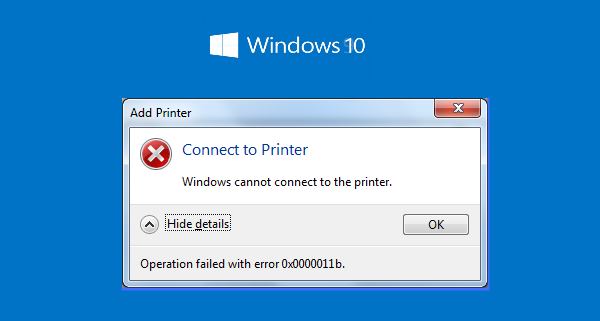
How to Fix Windows Cannot Connect to Printer
Windows Printer Sharing Error 0x0000011b Fix Printer Error 0x0000011b issue Accessing Shared PrinterMicrosoft Has fixed all the issue related to Printer Sharing
September 14, 2021—KB5005565 (OS Builds 19041.1237, 19042.1237, and 19043.1237)
Release Date: 9/14/2021
Version: OS Builds 19041.1237, 19042.1237, and 19043.1237
Windows 10 2004. 20H2 and 21H1KB2310138
Here is how to fix Printer Error 0x0000011b in Windows 10
Step 1:In Server PC: Check for TCP/IP => Inernet Protocol Version 4
Step 2: Configure Manual IP instead of Automatically IP Assign.
Step 3: Check with your Printer server Name, (Compurter or PC Name)
It should not have a long name or special characters or Numbers alone,
set relavent name for it.
Allow server machine to use filesharing with itself via the DNS Alias
Step 4: Check / Configure Network Sharing Rights for the printer (and Update Printer Driver).
Step 5: in Client PC using run command type "\\IP number of Printer Server"
Step 6: now you are able to view all the shared folders and printers,
double click on the printer icon to Install the printer driver in client PC.
Step 7: Still you are getting the same error, do followings
a. Create a new user with Administrative rights in "Server" Where you are conneted the Printer
b. Connect the "Server" with new user with password, in client where do you want to access the printer in sharring mode.
after this try the step 6.
How do I fix error 0xC1900101?
How can I fix 0xC1900101 errors on Windows 10 to Windows 11 Upgrade?
Windows is one of the most popular operating systems. The newest version recently came out – Windows 11, and as users rush to upgrade, they encounter various errors. Recently, a new upgrade 0xC1900101 – 0x60016 error was reported by a user that tried to update from Windows 10 Pro 21H1 build 19043.1288 to Windows 11. Many people do not realize that the upgrade is not available for everyone and the eligible systems have to meet specified requirements.
Check for Windows 11 Requirement
Check for Windows 11 Requirement
The other reason that people fail the upgrade is that they do not realize that a lot of free space is needed in order for the update to install. If users have completed all the required steps before starting the installation process, the cause for the 0xC1900101 – 0x60016 error can be quite complicated.
How to fix error code 0xC1900101 upgrading to Windows 11
The error codes starting with 0xC1900101 or 0x80090011 can indicate various problems during the Windows 11 upgrade process.
These are the common "0xC1900101" errors that you may come across upgrading to Windows 11:
0xC1900101 - 0x2000c
0xC1900101 - 0x20017
0xC1900101 - 0x30017
0xC1900101 - 0x30018
0xC1900101 - 0x3000D
0xC1900101 - 0x4000D
0xC1900101 - 0x40017
Cleanup storage space
The setup of Windows 11 requires several gigabytes of space to process the upgrade. If the device does not have enough available space, you may see one of the 0xC1900101 error codes. You can get around this problem by using the "Storage" and "Apps & features" settings to free up space.
You can use this guide to find many tips to delete unnecessary files to free up storage space.
Disconnect devices
If the computer has peripherals like external drives, printers, Bluetooth devices, USB devices, cameras, disconnect them before proceeding to reduce the chances of errors and other issues upgrading to Windows 11. You can always reconnect them after the upgrade.
Uninstall security apps
If there is a problem with third-party security software, you will likely see the error codes 0xC1900101 0x20017 and 0xC1900101 0x30017.
Repair corrupted files
1. Press Windows + X keys altogether to launch the Power menu2. Select Run option on the list and type cmd in the text box
3. Now press Ctrl + Shift + Enter to open Command Prompt as Admin
4. If the UAC dialog appears up, click Yes to authorize the access
5. On the elevated console, type the following command, and press Enter:
sfc /scannow
6. Reboot
Windows 11 How to install on unsupported hardware
How do I fix Windows Update 11 error?
How to fix error 0x80070070 when upgrading to Windows 11
What does error code 0x80070070 mean?
If you're upgrading to Windows 11 from Windows 10, and the upgrade process is interrupted by the error code 0x80070070, it means you have a storage space issue. Specifically, you're low on disk space on your Windows drive. You need to first free up space on the drive, and then upgrade the OS.
Here in this post, we have effective solutions apply to fix windows 11 update problems.
Check with Windows 11 requirements
1 Empty the Recycle Bin
2 Delete temporary files
3 Uninstall apps you don’t use
4 Clean the download folder
Check with Windows 11 requirements
1 Empty the Recycle Bin
2 Delete temporary files
3 Uninstall apps you don’t use
4 Clean the download folder
Empty the Recycle Bin
The files you delete from your hard drive are not automatically deleted. Rather, they move to a special folder called the Recycle Bin and stay there as long as you don’t decide to empty this folder. This also serves as a backup measure against accidental deletion.
To empty the Recycle Bin and thereby make more space on your hard drive, do the following.
Go to your desktop and right click on the Recycle Bin item.
Then select the Empty Recycle Bin option.
To finish, confirm the requested operation.
Then select the Empty Recycle Bin option.
To finish, confirm the requested operation.
Delete temporary files
Temporary files are files that are generated by the system’s own operation, including the use of programs and Internet browsing. They tend to be stored indeterminately if no maintenance is done on the PC. Its elimination is very simple using the following procedure.
In the search box on the taskbar, type disk cleanup.
From the list of results select the Disk Cleanup application.
Enter the System section and select Storage.
Next, click Temporary files.
Check the boxes for the items displayed in the Files that can be removed window and click OK.
Confirm the requested action.
For a more thorough clean, go back into Disk Cleanup and click Clean up system files. Check the boxes of items that can be removed without affecting the operation of the system and click OK. Confirm the requested action and restart your PC.
Uninstall apps you don’t use
Having many applications unused for long periods of time not only contributes to a lack of space but can also affect the performance or security of the system as it is also possible that they are outdated versions.Related Links...
Windows 10 printer error 0x00000709
Windows 11 error code 0x800f0950
How to get Windows 11 without TPM 2.0
Windows 11 How to install on unsupported hardware
Windows 11 How to Launch Task Manager
Upgrade from Windows 7 to Windows 10 for free
Windows 10 printer sharing error 0x0000011b
Windows 11 Upgrade from Windows 10 - A Free Upgrade
How to add 2-Step Verification in Gmail
PHPMailer Enable 2FA Send Mail with 2 Step Authentication
How to Fix Boot Error code: 0xc000014c, Win10/8
Latest Post
/Windows
/Windows
/Windows
/Windows
/Windows